> ## Documentation Index
> Fetch the complete documentation index at: https://docs.zionapp.co/llms.txt
> Use this file to discover all available pages before exploring further.
# Administrator guide: students and PACEs
> Manage the student roster, import students by CSV, assign and progress PACEs, and configure academic terms
This guide covers what an administrator sets up and maintains around students: the roster itself, CSV import, promotion and graduation at year end, PACE assignment and progression, and academic terms. Supervisors and monitors can view and edit students and assign PACEs, but only for students in their own assigned learning centres, and they cannot add, import, deactivate, or promote students. Adding, importing, deactivating, and promoting students, along with academic term configuration, are administrator-only.
## Roster management
Each student record holds a name, an optional student ID, date of birth, grade level (1 to 12), a learning centre, and optional parent email and phone. A duplicate student ID within your organization is rejected at creation.
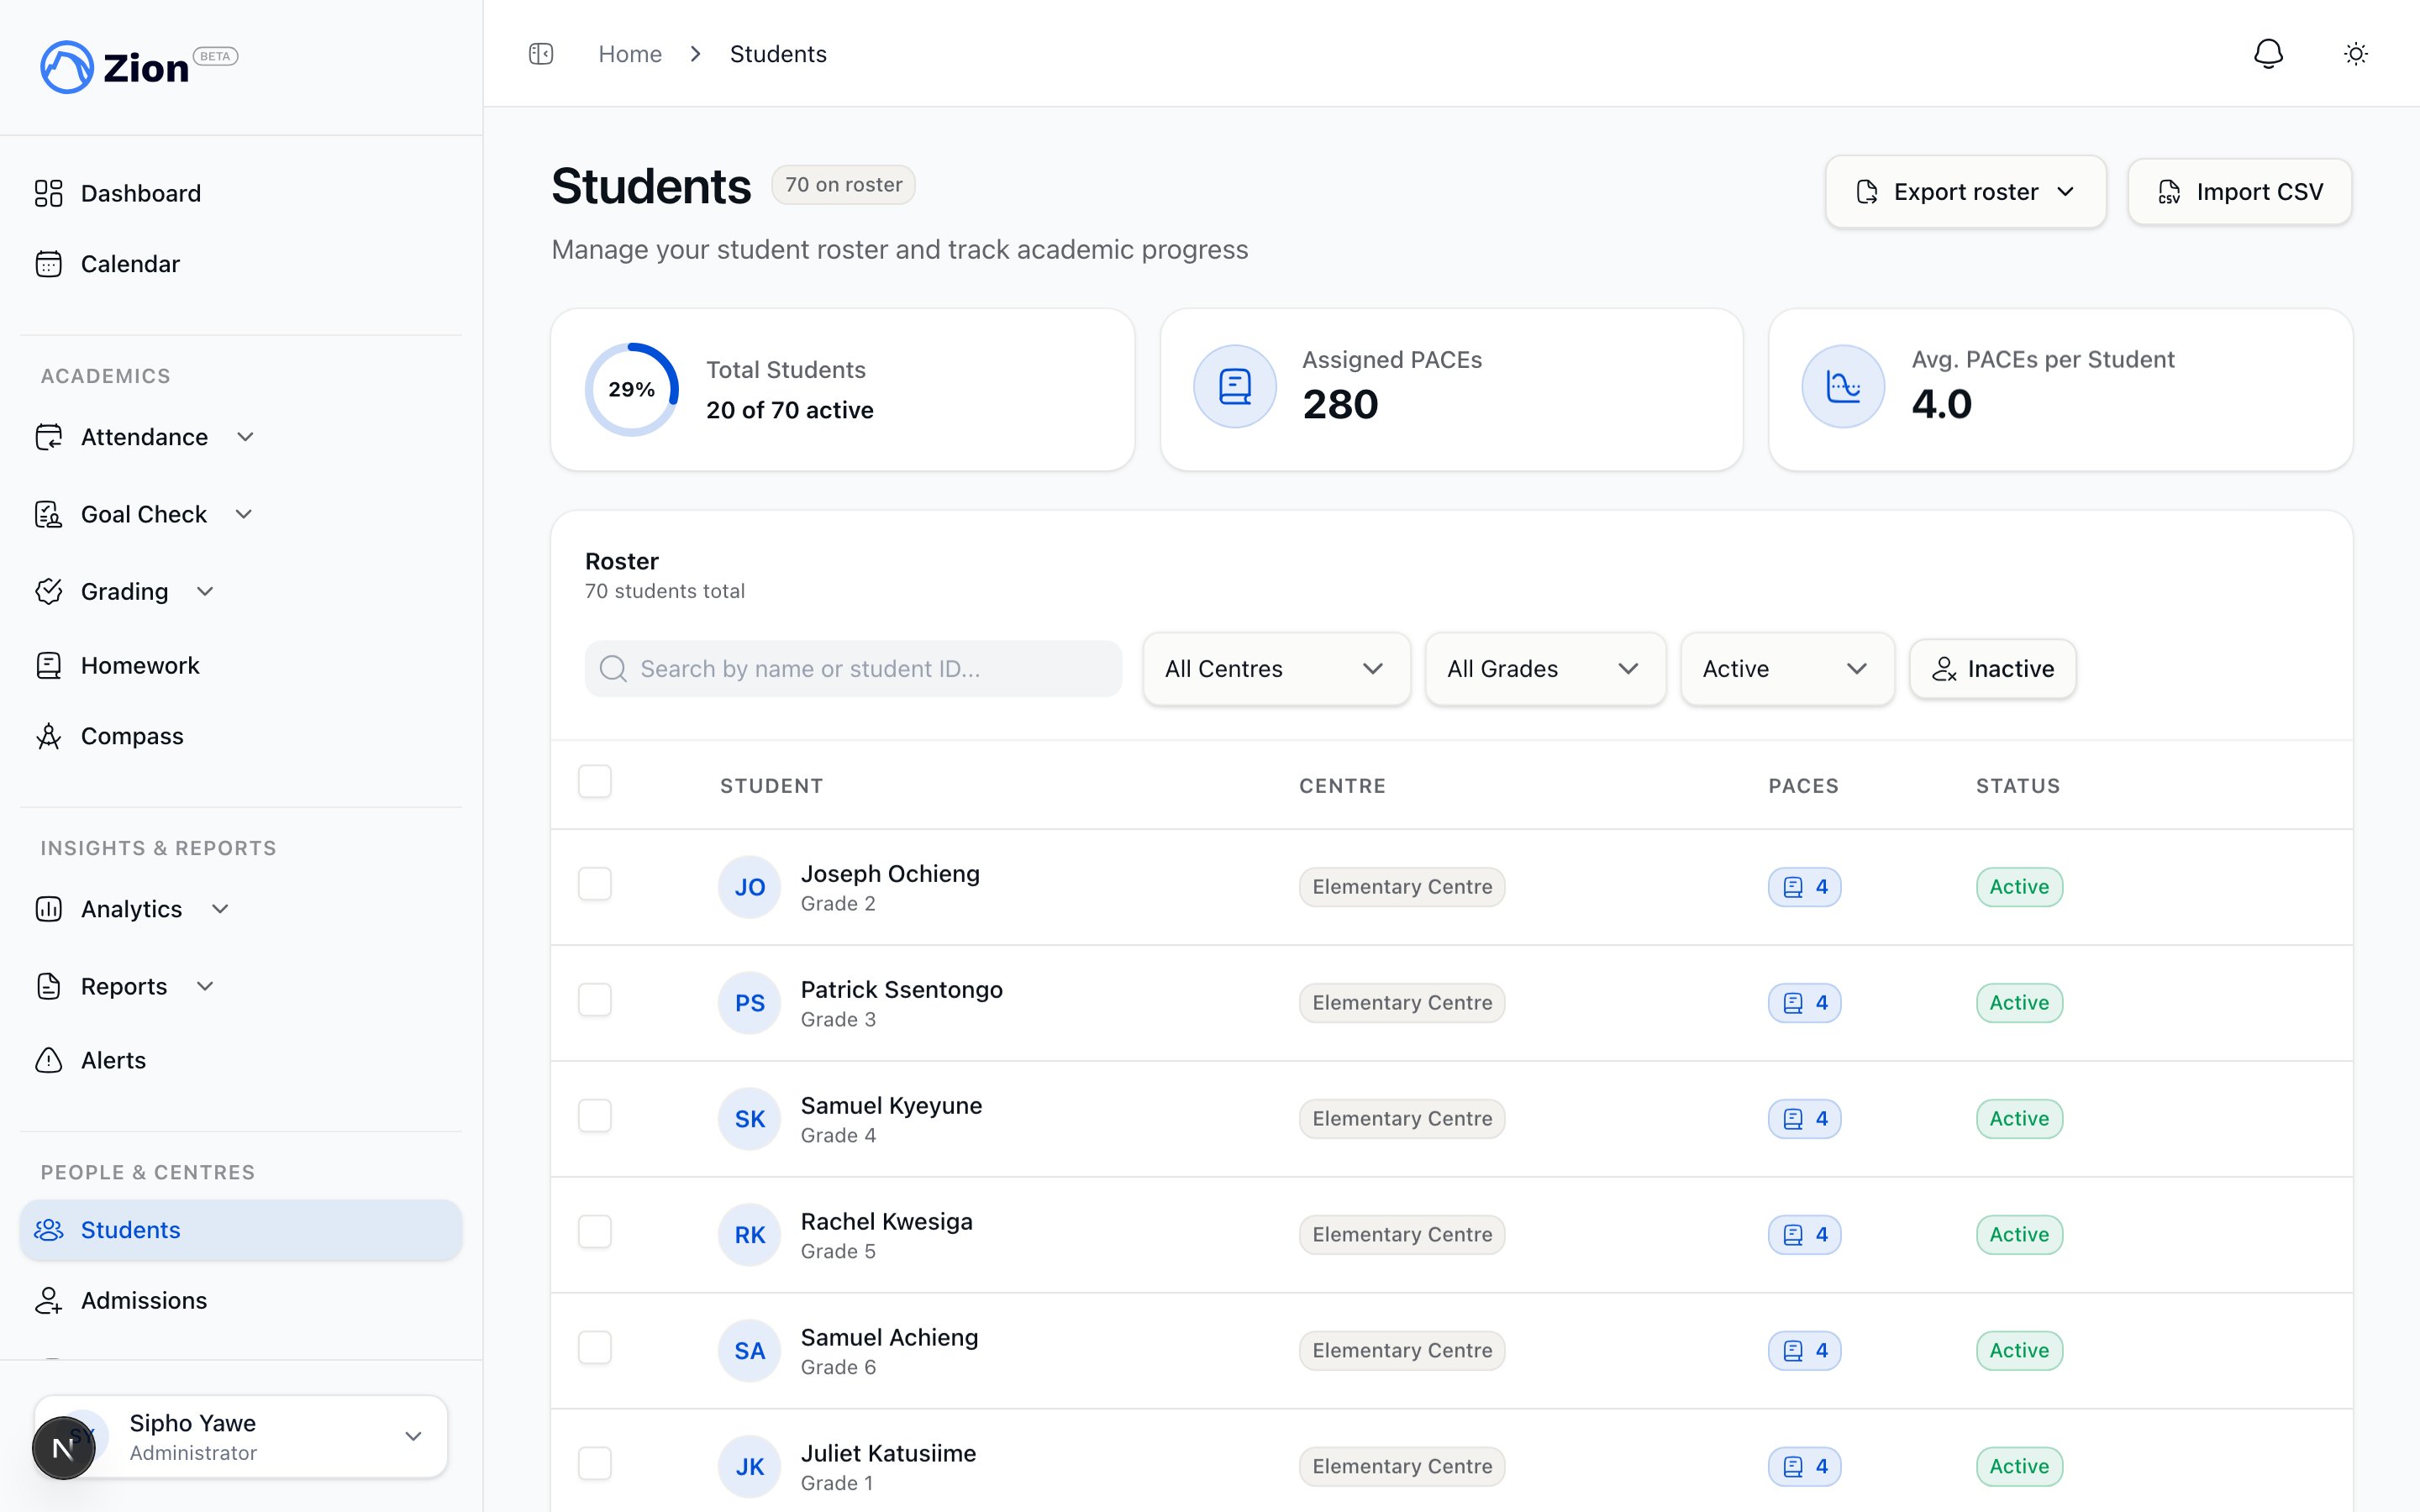 Navigate to Students in the sidebar. Administrators see every student in the organization; supervisors and monitors see only students in their assigned centres.
Click "Add Student" (or "Add Your First Student" on an empty roster) and fill in name, date of birth, grade level, and learning centre. Student ID and parent contact details are optional.
Submit the form. If you entered a parent email, a parent invitation is sent automatically. This does not block student creation if it fails.
Navigate to Students in the sidebar. Administrators see every student in the organization; supervisors and monitors see only students in their assigned centres.
Click "Add Student" (or "Add Your First Student" on an empty roster) and fill in name, date of birth, grade level, and learning centre. Student ID and parent contact details are optional.
Submit the form. If you entered a parent email, a parent invitation is sent automatically. This does not block student creation if it fails.
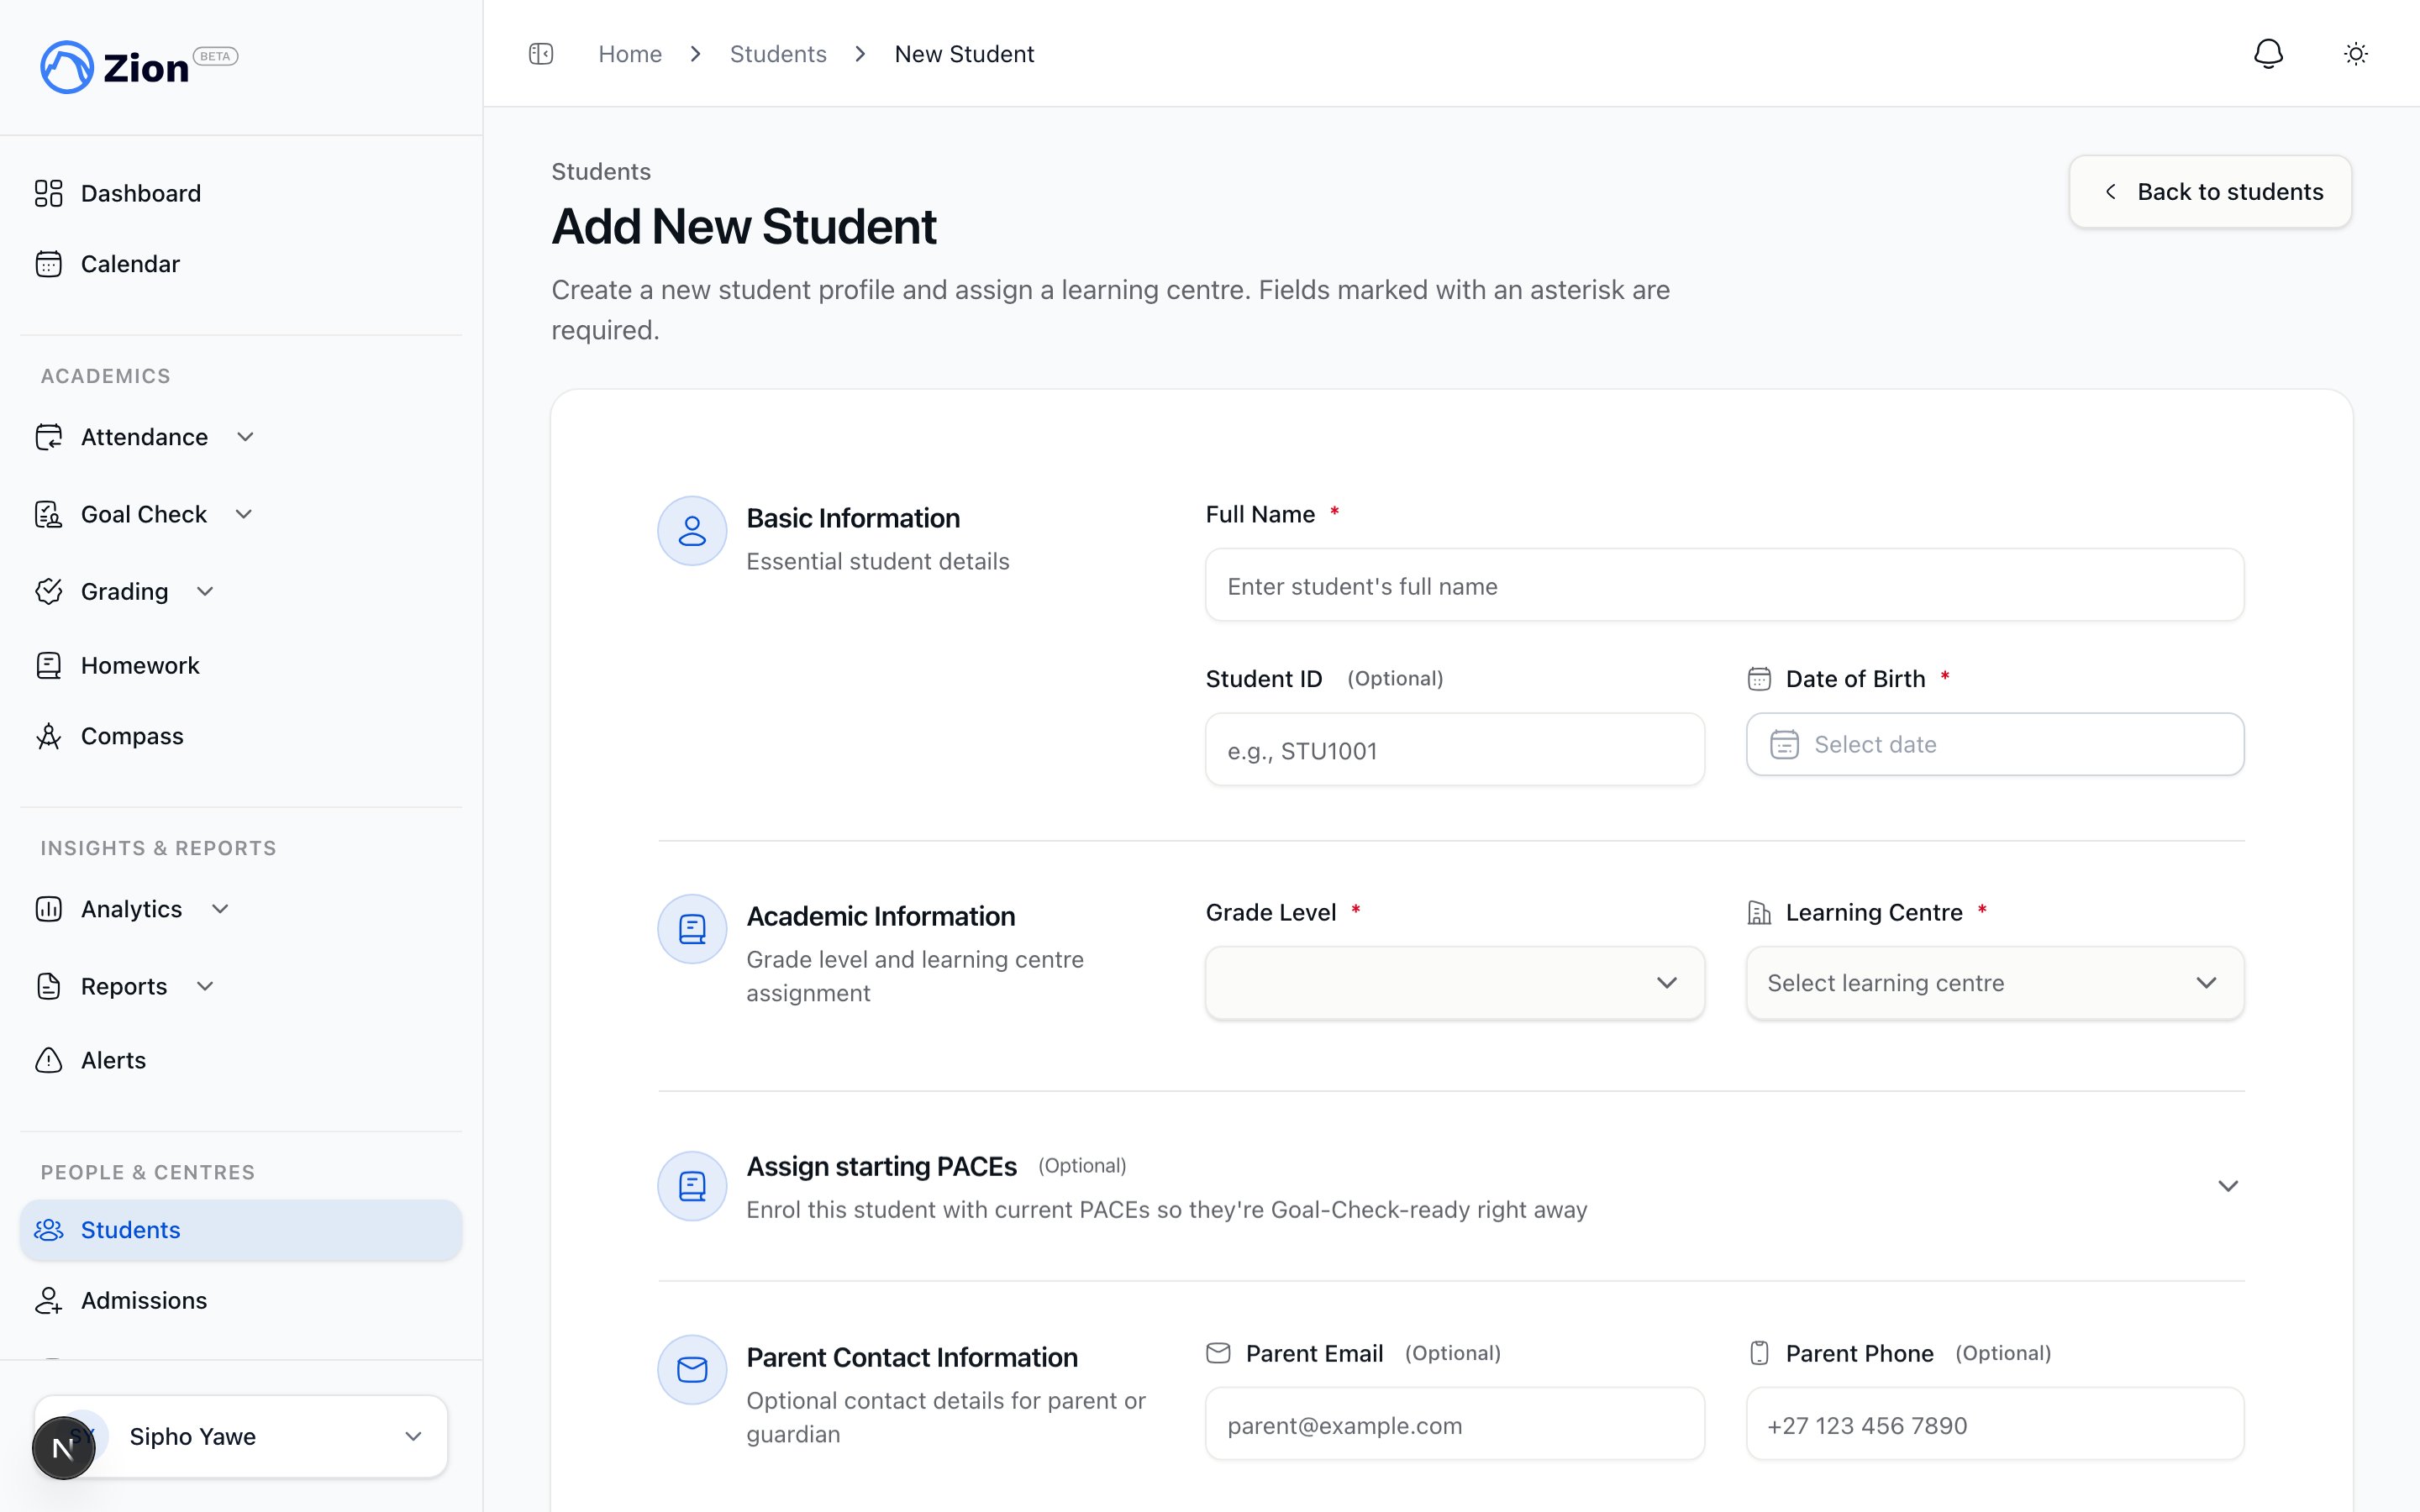 As you type a name and date of birth, Zion checks for a possible duplicate already on the roster with a close match on both. If it finds one, it shows a warning naming the existing student, but it never blocks you from saving. Use your judgment: proceed if this is genuinely a different student, or open the existing record instead if it is the same one.
To edit a student, open their record and update any field, including reassigning their learning centre or grade level. Deactivating a student is a soft delete: the student disappears from active lists and Goal Check entry, but all historical Goal Check, grading, and attendance data is preserved and can still be reported on. When you deactivate a student, choose a reason category (Withdrawn, Graduated, Transferred, or Other) and optionally add a note. Both are saved to the student's record as their "Deactivation record" so anyone reviewing the roster later can see why they left. Reactivating restores the student to active lists. Reassigning centres mid-term works immediately but disrupts a student's routine with their supervisor, so plan centre moves around term breaks where possible.
### Bulk roster actions
Select up to 200 students at once from the roster to:
* Deactivate them in bulk
* Reassign centre and/or grade level in bulk
* Assign up to 12 PACEs to the group in bulk
Each student in a bulk action is evaluated on its own. If one student is blocked (for example, by a progression rule or an inactive status), that student is skipped with a reason and the rest of the batch still completes. One audit log entry is written per bulk action.
Supervisors and monitors are restricted to their assigned centres no matter what filters they set on screen. If a supervisor or monitor applies an unassigned centre filter, they see zero results rather than the full organization roster.
## CSV bulk import
CSV import is the fastest way to load a roster at the start of a school year or when transferring from another system.
From Students, click "Import CSV." Download the template if you need the column layout.
Upload a CSV file up to 5MB, with one row per student: name, student ID, date of birth, grade level, learning centre, and optional parent email and phone.
Click "Validate CSV." Zion previews each row as valid or invalid, flags any learning centre that would go at or over its configured capacity, and flags any row that looks like a possible duplicate of a student already on the roster. Capacity and possible-duplicate flags are informational and do not block the import.
Click "Import valid rows." Zion checks every row again at import time, so only rows that pass both checks are written.
Download the error report for any skipped rows, correct the CSV, and re-upload if needed.
See the exact column layout in the [CSV templates reference](/reference/csv-templates) and the full walkthrough in [CSV Bulk Import](/features/students/bulk-import).
## Promote students
At the end of the school year, use "Promote students" to advance a whole grade level, or a specific list of students, to the next grade in one pass. This button is administrator-only and appears on the Students page.
From Students, click "Promote students."
Pick a scope: an entire grade level, optionally narrowed to one learning centre, or a pasted list of student ID codes.
"Graduate final grade students instead of leaving them in place" is on by default. With it on, students in the school's final grade are deactivated with a Graduated deactivation record instead of being advanced. Turn it off if you want to promote everyone else but leave final grade students active for now.
Click "Preview changes" to see exactly who will be promoted, who will be graduated, and who will be skipped and why. Once you are satisfied, click "Apply promotion."
Applying a promotion is a one-shot action with no undo. Review the preview carefully before you apply it, especially the graduate toggle.
## PACE assignment and progression
The PACE catalog is the shared ACE curriculum reference, covering core subjects, Bible Reading, and a large range of elective and Lifepac courses across grade levels 1 through 12. An administrator can also add a school's own custom subjects and PACEs to the catalog, and can edit a PACE's page count and level. Browse and search the catalog at [PACE Catalog](/features/paces/catalog).
A student needs PACEs assigned before a supervisor can set Goal Check goals for them. Assignment enforces one rule: you cannot assign PACE N in a subject until every earlier PACE in that same subject has been passed. "Passed" means a finalized passing score, the PACE already marked completed, or an administrator-granted progression override with a plan for how the student will catch up on record. A practice or self-test score does not satisfy this rule. Assignment also fails if the student is inactive or already has that PACE assigned.
From Students, click the student's name to open their detail page.
Open the PACE assignment dialog, search the catalog by number or subject, and select one or more PACEs (up to 12 per assignment call).
Save the assignment. Inventory for each assigned PACE is decremented automatically. A low or negative stock count shows as a warning and does not block the assignment.
When a student finishes a PACE, mark it completed on their profile. If your school has the auto-advance PACEs setting turned on, the next sequential PACE in that subject is assigned automatically, still subject to the same progression, centre, and role checks. With auto-advance off, which is the default, Zion suggests the next PACE for a one-click assignment instead. A completed PACE can be reopened back to in-progress if it was marked complete in error, and any assignment can be unassigned entirely if it was made by mistake.
See [PACE Assignments](/features/students/pace-assignments) for the full assignment and progression walkthrough.
## Academic terms
Academic terms anchor Goal Check, grading, and reporting to your school calendar. Term configuration is administrator-only.
Navigate to Academic Terms.
Click "Create New Term" and enter a name (3 to 50 characters), a start date, and an end date. The end date must fall after the start date, and a date range that overlaps an existing term is rejected.
Click "Set as current" on the term that should be active now. Only one term can be current at a time. Setting a new current term clears the flag from every other term.
Deleting a term is blocked if it already has goals or scores linked to it.
If no term is explicitly set as current, Zion falls back to whichever term's date range contains today.
## Related resources
Roster fields, active and inactive status, and centre-scoped visibility.
Full import workflow, validation rules, and error handling.
Assignment, progression, completion, and reopening in detail.
Browse and search the full ACE PACE catalog.
How terms drive Goal Check, grading, and reporting.
Set up centres before assigning students to them.
How PACE assignments enable daily goal setting.
Column layout for the student import template.
As you type a name and date of birth, Zion checks for a possible duplicate already on the roster with a close match on both. If it finds one, it shows a warning naming the existing student, but it never blocks you from saving. Use your judgment: proceed if this is genuinely a different student, or open the existing record instead if it is the same one.
To edit a student, open their record and update any field, including reassigning their learning centre or grade level. Deactivating a student is a soft delete: the student disappears from active lists and Goal Check entry, but all historical Goal Check, grading, and attendance data is preserved and can still be reported on. When you deactivate a student, choose a reason category (Withdrawn, Graduated, Transferred, or Other) and optionally add a note. Both are saved to the student's record as their "Deactivation record" so anyone reviewing the roster later can see why they left. Reactivating restores the student to active lists. Reassigning centres mid-term works immediately but disrupts a student's routine with their supervisor, so plan centre moves around term breaks where possible.
### Bulk roster actions
Select up to 200 students at once from the roster to:
* Deactivate them in bulk
* Reassign centre and/or grade level in bulk
* Assign up to 12 PACEs to the group in bulk
Each student in a bulk action is evaluated on its own. If one student is blocked (for example, by a progression rule or an inactive status), that student is skipped with a reason and the rest of the batch still completes. One audit log entry is written per bulk action.
Supervisors and monitors are restricted to their assigned centres no matter what filters they set on screen. If a supervisor or monitor applies an unassigned centre filter, they see zero results rather than the full organization roster.
## CSV bulk import
CSV import is the fastest way to load a roster at the start of a school year or when transferring from another system.
From Students, click "Import CSV." Download the template if you need the column layout.
Upload a CSV file up to 5MB, with one row per student: name, student ID, date of birth, grade level, learning centre, and optional parent email and phone.
Click "Validate CSV." Zion previews each row as valid or invalid, flags any learning centre that would go at or over its configured capacity, and flags any row that looks like a possible duplicate of a student already on the roster. Capacity and possible-duplicate flags are informational and do not block the import.
Click "Import valid rows." Zion checks every row again at import time, so only rows that pass both checks are written.
Download the error report for any skipped rows, correct the CSV, and re-upload if needed.
See the exact column layout in the [CSV templates reference](/reference/csv-templates) and the full walkthrough in [CSV Bulk Import](/features/students/bulk-import).
## Promote students
At the end of the school year, use "Promote students" to advance a whole grade level, or a specific list of students, to the next grade in one pass. This button is administrator-only and appears on the Students page.
From Students, click "Promote students."
Pick a scope: an entire grade level, optionally narrowed to one learning centre, or a pasted list of student ID codes.
"Graduate final grade students instead of leaving them in place" is on by default. With it on, students in the school's final grade are deactivated with a Graduated deactivation record instead of being advanced. Turn it off if you want to promote everyone else but leave final grade students active for now.
Click "Preview changes" to see exactly who will be promoted, who will be graduated, and who will be skipped and why. Once you are satisfied, click "Apply promotion."
Applying a promotion is a one-shot action with no undo. Review the preview carefully before you apply it, especially the graduate toggle.
## PACE assignment and progression
The PACE catalog is the shared ACE curriculum reference, covering core subjects, Bible Reading, and a large range of elective and Lifepac courses across grade levels 1 through 12. An administrator can also add a school's own custom subjects and PACEs to the catalog, and can edit a PACE's page count and level. Browse and search the catalog at [PACE Catalog](/features/paces/catalog).
A student needs PACEs assigned before a supervisor can set Goal Check goals for them. Assignment enforces one rule: you cannot assign PACE N in a subject until every earlier PACE in that same subject has been passed. "Passed" means a finalized passing score, the PACE already marked completed, or an administrator-granted progression override with a plan for how the student will catch up on record. A practice or self-test score does not satisfy this rule. Assignment also fails if the student is inactive or already has that PACE assigned.
From Students, click the student's name to open their detail page.
Open the PACE assignment dialog, search the catalog by number or subject, and select one or more PACEs (up to 12 per assignment call).
Save the assignment. Inventory for each assigned PACE is decremented automatically. A low or negative stock count shows as a warning and does not block the assignment.
When a student finishes a PACE, mark it completed on their profile. If your school has the auto-advance PACEs setting turned on, the next sequential PACE in that subject is assigned automatically, still subject to the same progression, centre, and role checks. With auto-advance off, which is the default, Zion suggests the next PACE for a one-click assignment instead. A completed PACE can be reopened back to in-progress if it was marked complete in error, and any assignment can be unassigned entirely if it was made by mistake.
See [PACE Assignments](/features/students/pace-assignments) for the full assignment and progression walkthrough.
## Academic terms
Academic terms anchor Goal Check, grading, and reporting to your school calendar. Term configuration is administrator-only.
Navigate to Academic Terms.
Click "Create New Term" and enter a name (3 to 50 characters), a start date, and an end date. The end date must fall after the start date, and a date range that overlaps an existing term is rejected.
Click "Set as current" on the term that should be active now. Only one term can be current at a time. Setting a new current term clears the flag from every other term.
Deleting a term is blocked if it already has goals or scores linked to it.
If no term is explicitly set as current, Zion falls back to whichever term's date range contains today.
## Related resources
Roster fields, active and inactive status, and centre-scoped visibility.
Full import workflow, validation rules, and error handling.
Assignment, progression, completion, and reopening in detail.
Browse and search the full ACE PACE catalog.
How terms drive Goal Check, grading, and reporting.
Set up centres before assigning students to them.
How PACE assignments enable daily goal setting.
Column layout for the student import template.