> ## Documentation Index
> Fetch the complete documentation index at: https://docs.zionapp.co/llms.txt
> Use this file to discover all available pages before exploring further.
# Supervisor guide: attendance
> How supervisors mark daily attendance and work chronic-absence alerts for their assigned learning centres
As a supervisor, you mark daily attendance for the learning centres you are assigned to and follow up on chronic-absence alerts for those centres. This guide covers the daily marking workflow, alert handling, and the dashboard and trend views scoped to your centre.
You only see and mark students in your assigned learning centre(s). If a student does not appear, confirm they are assigned to one of your centres, or ask your administrator to check.
## Daily marking workflow
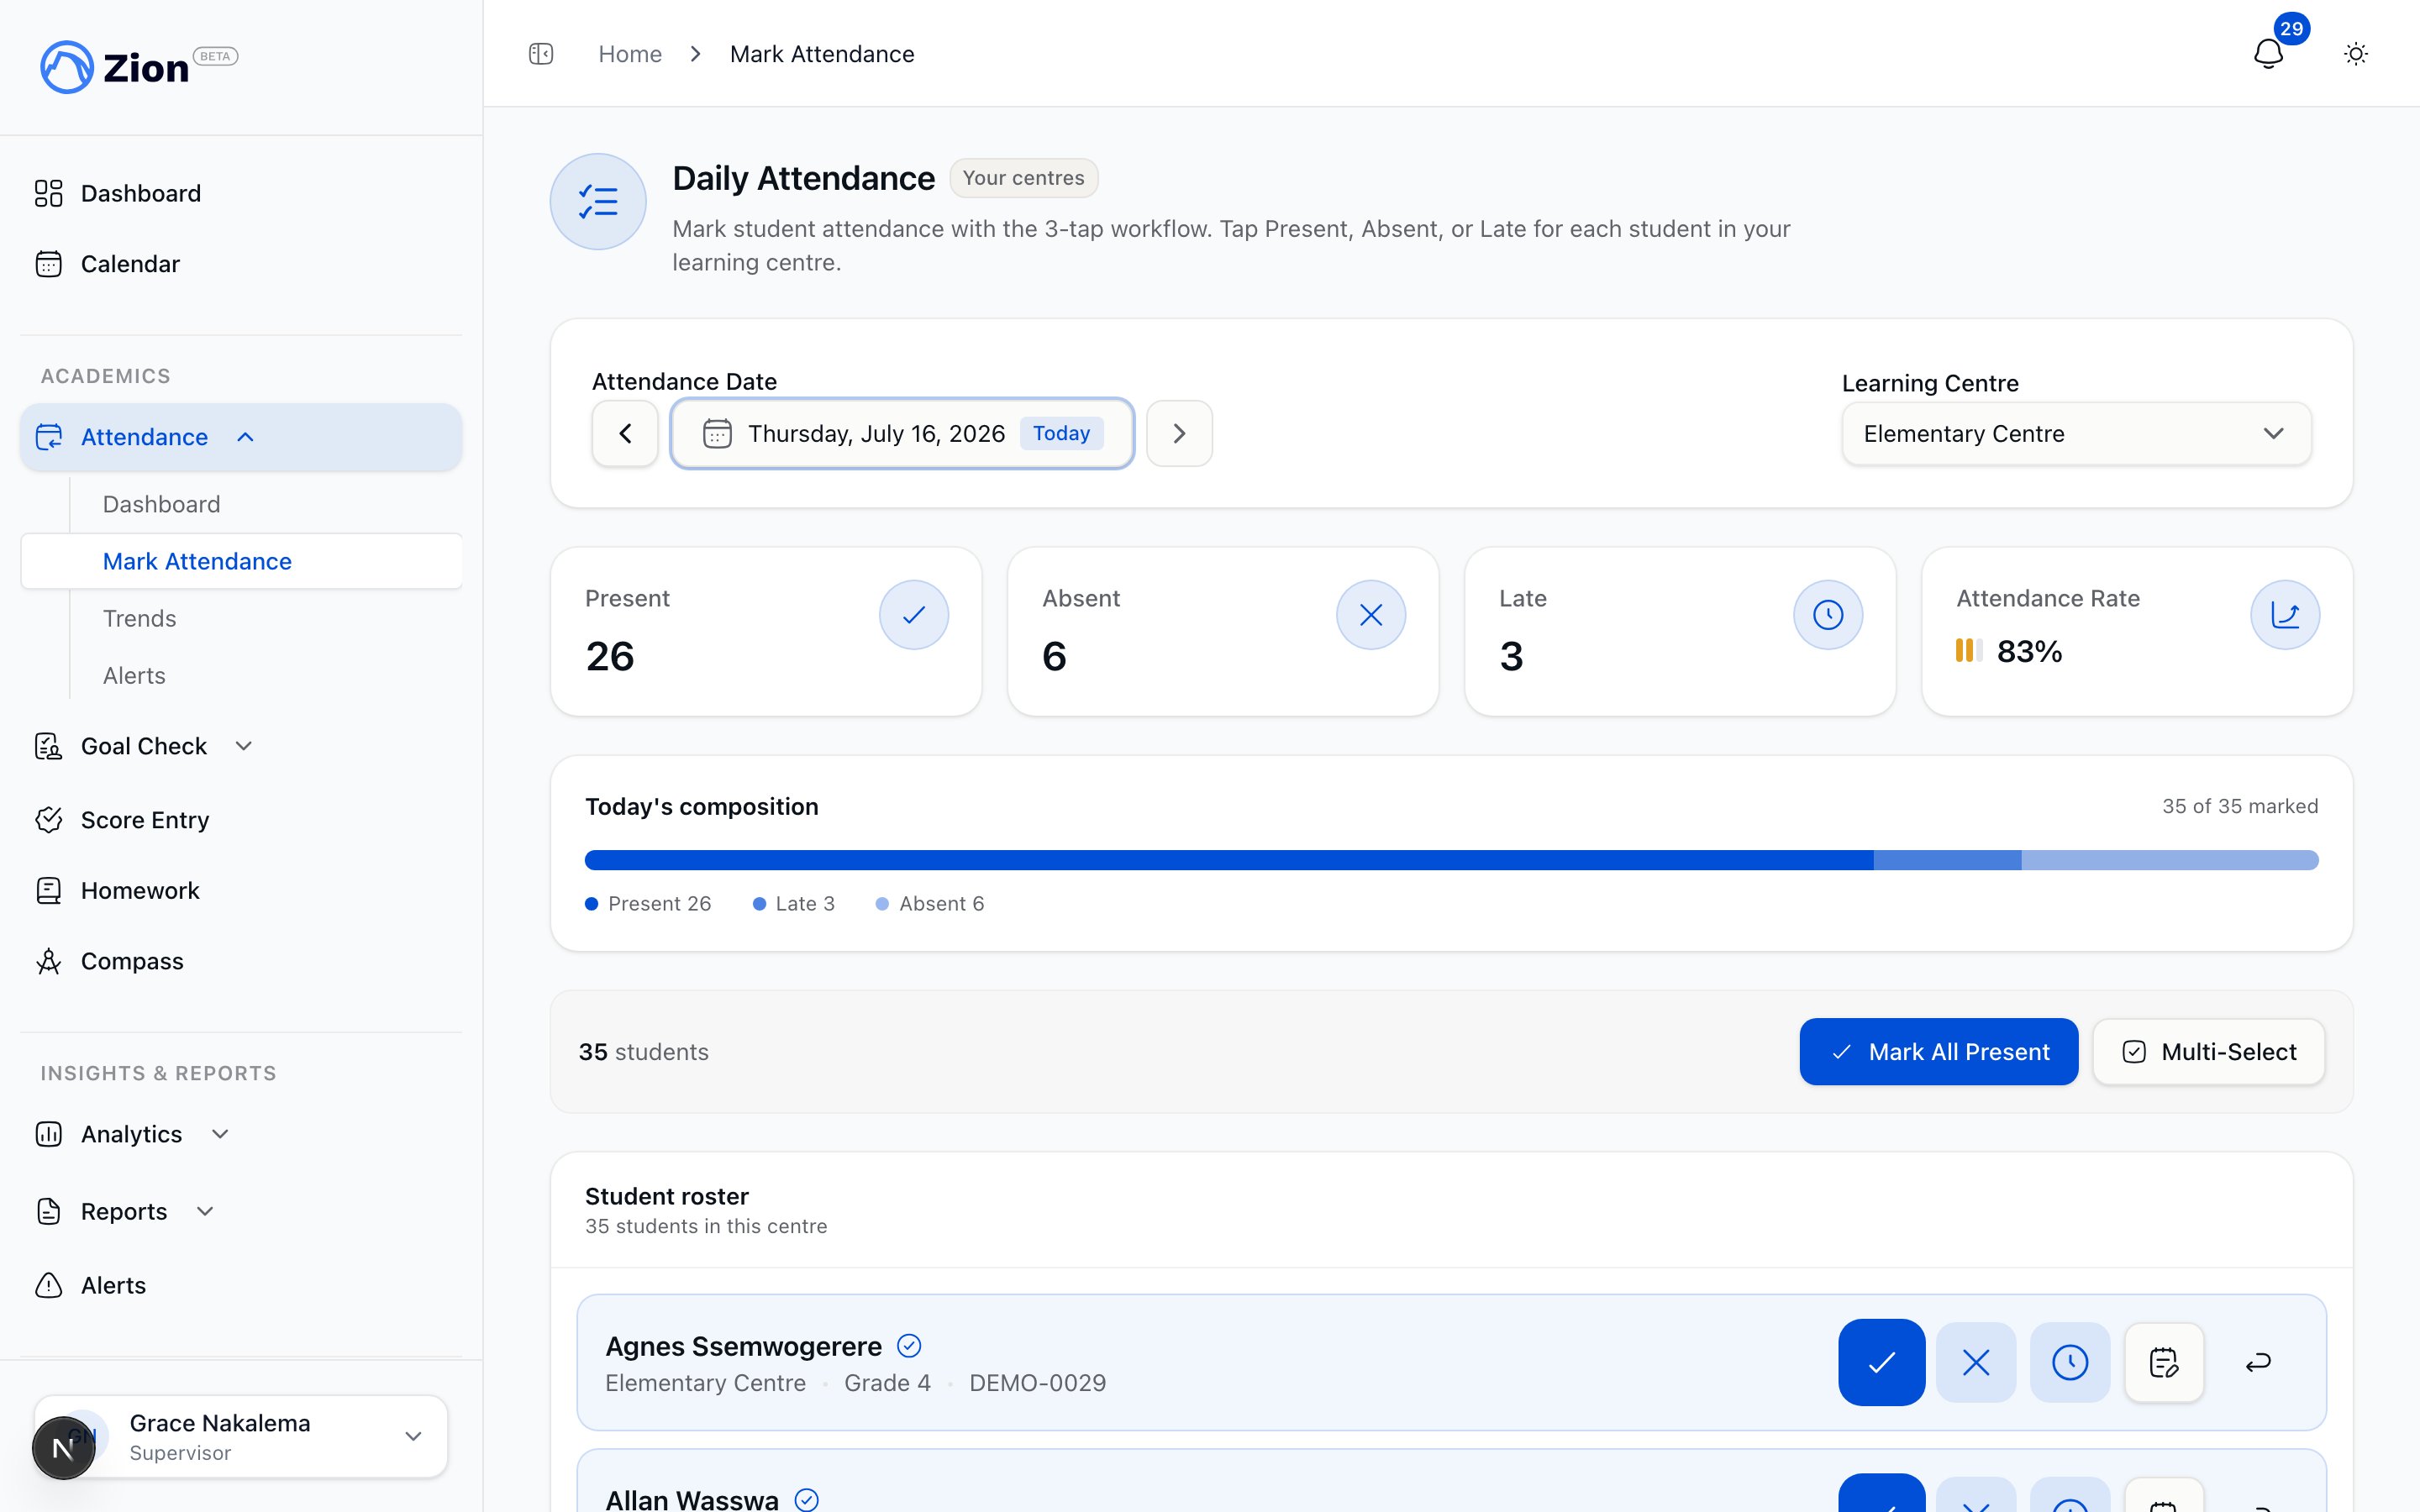 Navigate to **Attendance > Mark Attendance** in the sidebar. The marking interface opens with today's date and your centre selected.
The date defaults to today. If you have more than one assigned centre, pick the one you are marking from the centre dropdown.
Unmarked students are sorted to the top of the list, then alphabetically. For each student, tap **Present**, **Absent**, or **Late**. A status saves as soon as you tap it.
For **Late**, you can set an arrival time and add a note. For **Absent**, add a note if you know the reason (for example, "doctor appointment"). Notes are visible to administrators.
Tap **Mark All Present**, confirm in the dialog, then mark the exceptions individually as Absent or Late. You can also multi-select a group of students and bulk-mark them in one action.
The summary bar shows total, marked, and unmarked counts, plus the present/absent/late breakdown, updating in real time as you mark.
If you mark a student incorrectly, tap the correct status button. The new status replaces the old one immediately. You can also clear a student back to unmarked if needed.
## Attendance status reference
| Status | Meaning | Extra fields |
| ------- | ------------------------------------------ | ------------------------------------ |
| Present | Student was in class | None |
| Absent | Student was not present | Optional note |
| Late | Student arrived after the start of the day | Optional arrival time, optional note |
## What you cannot mark
Attendance is editable only for today. Once that day passes, the record locks and you cannot change it, even for a student you marked incorrectly earlier that same week.
Only an administrator can correct a locked prior-day record. If you need a past date fixed, tell your administrator the student, date, and correct status. Their correction is written to an audited before/after trail.
## Your attendance dashboard
Navigate to **Attendance > Dashboard** to see your centre's numbers:
* Present, absent, and late counts for the selected day
* Your centre's attendance rate
* A centre breakdown if you supervise more than one centre
* An **Export CSV** option for the data shown
## Attendance trends
Navigate to **Attendance > Trends** to review your centre over time. Pick a range (7 days, 30 days, current term, or a custom range) and optionally filter by grade level. The trend view shows daily present/absent/late/rate figures alongside a summary: average rate, best and worst day, and whether the trend is improving, stable, or declining.
Full attendance report generation (PDF/CSV reports with chronic-absence and late-arrival lists, shareable by email) is an administrator-only page. As a supervisor, use the dashboard export and trends view for your centre's data.
## Handling chronic-absence alerts
Zion generates alerts automatically once a student crosses a consecutive-absence or 30-day absence-rate threshold. Defaults are a warning at 3 or more consecutive school-day absences and a critical alert at 5 or more consecutive absences, or a 30-day absence rate above 20 percent. Your organization may have adjusted these thresholds.
You see open alerts only for students in your assigned centre(s), filterable by type (warning or critical).
Each alert shows the student, alert type, consecutive absence count, and 30-day absence rate.
**Acknowledge** the alert and enter intervention notes describing what you did (for example, a conversation with the student or a call to a parent). **Dismiss** it with a short reason if it does not need follow-up (for example, a documented medical leave).
An alert clears on its own once the student no longer meets the threshold on a later run. You do not need to close it manually once the pattern breaks.
Acknowledging or dismissing an alert requires a note or reason and is recorded in the audit trail. This scopes to your assigned centres only, the same restriction that applies to marking. Once you acknowledge or dismiss an alert, Zion will not raise that same alert again for about a week, even if the pattern continues.
## Best practices
* Mark attendance close to the start of the day so present-versus-late is accurate.
* Update Late status with an arrival time as soon as you know it.
* Add a note whenever you know the reason for an absence. It helps administrators and saves you a follow-up conversation later.
* Check the summary bar before you leave for the day. Unmarked should read zero.
* Act on alerts promptly. Acknowledging with a real intervention note is more useful than leaving alerts open.
## Related pages
How Zion's attendance module works across all roles
Detailed reference for the marking interface
How chronic-absence alerts are calculated and resolved
Reading trend direction and centre comparisons
Reports, org-wide alerts, and prior-day corrections
Your centre's overview across all modules
Navigate to **Attendance > Mark Attendance** in the sidebar. The marking interface opens with today's date and your centre selected.
The date defaults to today. If you have more than one assigned centre, pick the one you are marking from the centre dropdown.
Unmarked students are sorted to the top of the list, then alphabetically. For each student, tap **Present**, **Absent**, or **Late**. A status saves as soon as you tap it.
For **Late**, you can set an arrival time and add a note. For **Absent**, add a note if you know the reason (for example, "doctor appointment"). Notes are visible to administrators.
Tap **Mark All Present**, confirm in the dialog, then mark the exceptions individually as Absent or Late. You can also multi-select a group of students and bulk-mark them in one action.
The summary bar shows total, marked, and unmarked counts, plus the present/absent/late breakdown, updating in real time as you mark.
If you mark a student incorrectly, tap the correct status button. The new status replaces the old one immediately. You can also clear a student back to unmarked if needed.
## Attendance status reference
| Status | Meaning | Extra fields |
| ------- | ------------------------------------------ | ------------------------------------ |
| Present | Student was in class | None |
| Absent | Student was not present | Optional note |
| Late | Student arrived after the start of the day | Optional arrival time, optional note |
## What you cannot mark
Attendance is editable only for today. Once that day passes, the record locks and you cannot change it, even for a student you marked incorrectly earlier that same week.
Only an administrator can correct a locked prior-day record. If you need a past date fixed, tell your administrator the student, date, and correct status. Their correction is written to an audited before/after trail.
## Your attendance dashboard
Navigate to **Attendance > Dashboard** to see your centre's numbers:
* Present, absent, and late counts for the selected day
* Your centre's attendance rate
* A centre breakdown if you supervise more than one centre
* An **Export CSV** option for the data shown
## Attendance trends
Navigate to **Attendance > Trends** to review your centre over time. Pick a range (7 days, 30 days, current term, or a custom range) and optionally filter by grade level. The trend view shows daily present/absent/late/rate figures alongside a summary: average rate, best and worst day, and whether the trend is improving, stable, or declining.
Full attendance report generation (PDF/CSV reports with chronic-absence and late-arrival lists, shareable by email) is an administrator-only page. As a supervisor, use the dashboard export and trends view for your centre's data.
## Handling chronic-absence alerts
Zion generates alerts automatically once a student crosses a consecutive-absence or 30-day absence-rate threshold. Defaults are a warning at 3 or more consecutive school-day absences and a critical alert at 5 or more consecutive absences, or a 30-day absence rate above 20 percent. Your organization may have adjusted these thresholds.
You see open alerts only for students in your assigned centre(s), filterable by type (warning or critical).
Each alert shows the student, alert type, consecutive absence count, and 30-day absence rate.
**Acknowledge** the alert and enter intervention notes describing what you did (for example, a conversation with the student or a call to a parent). **Dismiss** it with a short reason if it does not need follow-up (for example, a documented medical leave).
An alert clears on its own once the student no longer meets the threshold on a later run. You do not need to close it manually once the pattern breaks.
Acknowledging or dismissing an alert requires a note or reason and is recorded in the audit trail. This scopes to your assigned centres only, the same restriction that applies to marking. Once you acknowledge or dismiss an alert, Zion will not raise that same alert again for about a week, even if the pattern continues.
## Best practices
* Mark attendance close to the start of the day so present-versus-late is accurate.
* Update Late status with an arrival time as soon as you know it.
* Add a note whenever you know the reason for an absence. It helps administrators and saves you a follow-up conversation later.
* Check the summary bar before you leave for the day. Unmarked should read zero.
* Act on alerts promptly. Acknowledging with a real intervention note is more useful than leaving alerts open.
## Related pages
How Zion's attendance module works across all roles
Detailed reference for the marking interface
How chronic-absence alerts are calculated and resolved
Reading trend direction and centre comparisons
Reports, org-wide alerts, and prior-day corrections
Your centre's overview across all modules