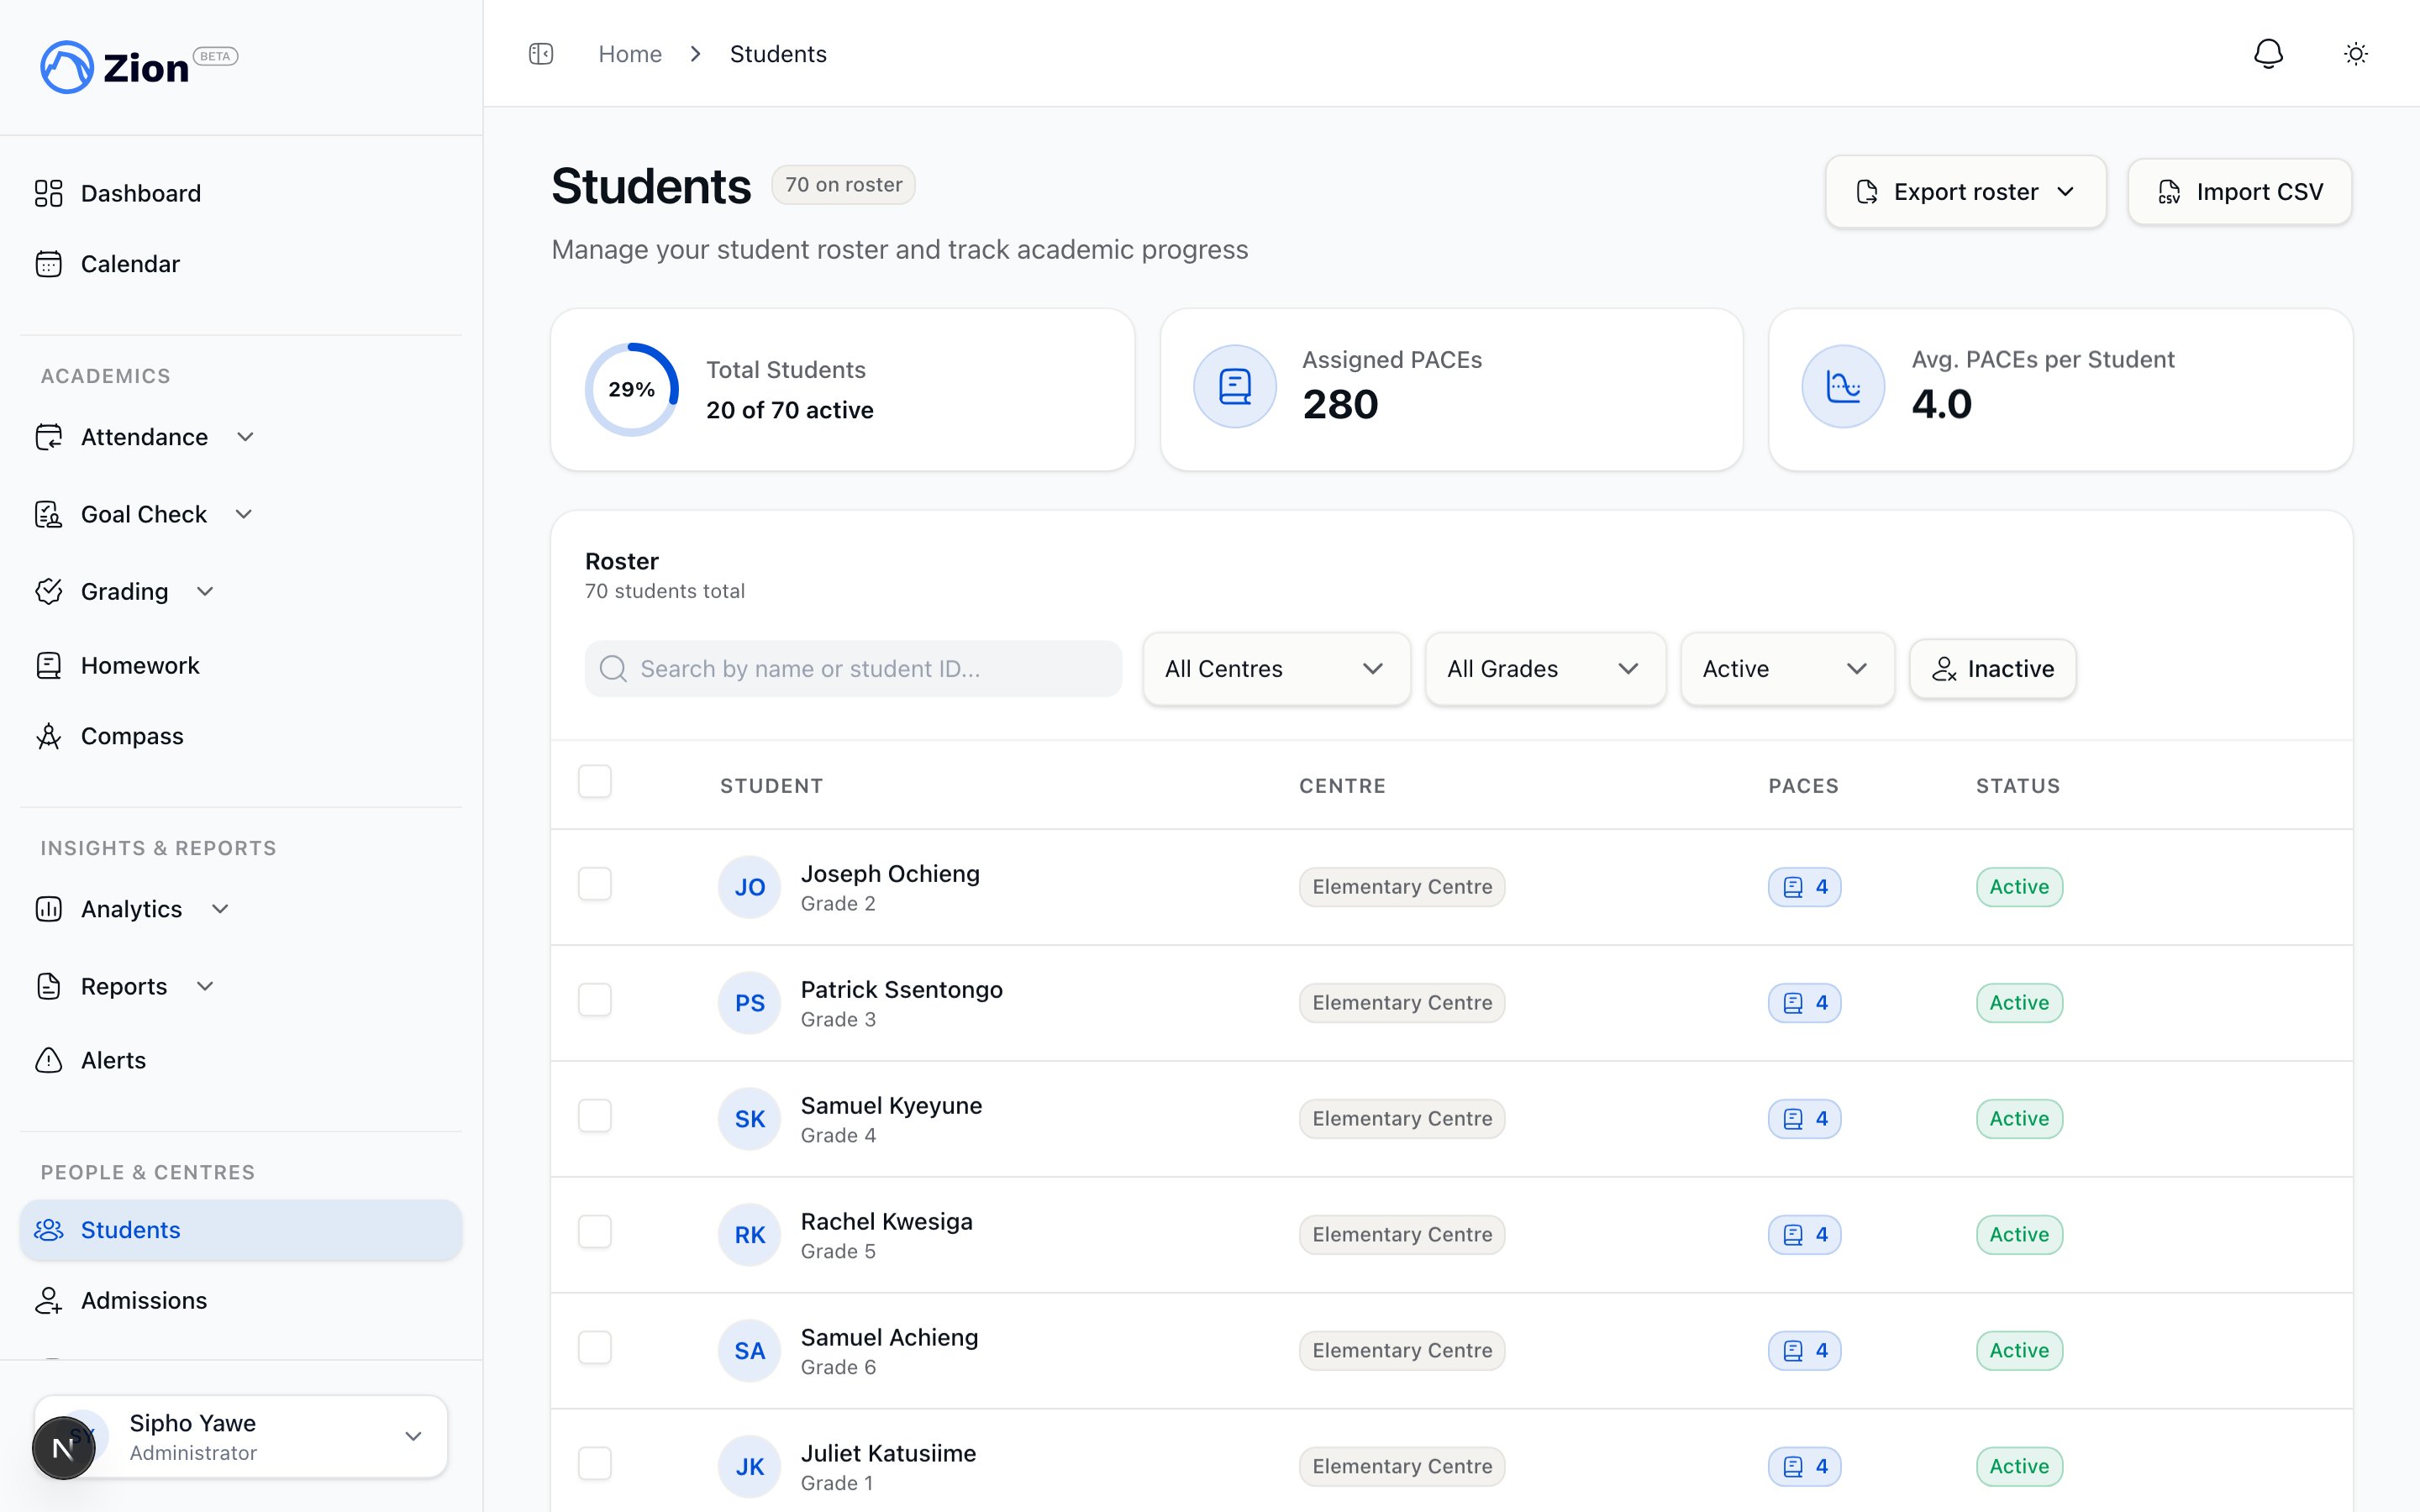
Student Management Overview

Comprehensive overview of student management in Zion - from initial roster setup to ongoing maintenance, centre assignments, and PACE allocations. This guide helps administrators build and maintain an accurate student database.

Why Student Management Matters

Student Data is the Foundation:
  • Goal Check requires students with PACE assignments
  • Accurate rosters enable proper centre assignments
  • Clean data prevents errors in reporting
  • Historical records support continuity year-to-year
Zion’s Student Management Enables:
  • Individual student profiles with all relevant information
  • Learning centre assignments for proper Goal Check access
  • PACE assignments for individualized pacing
  • Status management (active vs deactivated)
  • Historical tracking and reporting

Student Management Workflow

Initial Setup (Start of Year)

1

Gather Student Data

Collect names, DOB, grades, parent contact info from enrollment forms
2

Prepare CSV or Add Individually

For 20+ students, use CSV bulk import. For fewer, add individually.
3

Import/Add Students

Create all student profiles in Zion
4

Assign to Learning Centres

Place students in appropriate centres based on grade/capacity
5

Assign PACEs

Give each student 4-6 PACEs to start term
6

Verify Completeness

Check that all students have centres and PACEs assigned
Timeline: 2-3 hours for 100-student school using CSV bulk import

Ongoing Maintenance (Throughout Year)

Weekly Tasks (5 minutes):
  • Add new enrollments
  • Process withdrawals (deactivate students)
  • Update contact information as needed
Monthly Tasks (15 minutes):
  • Audit for data quality (duplicates, missing info)
  • Verify centre assignments still appropriate
  • Check PACE progression (students advancing appropriately?)
Term-End Tasks (1 hour):
  • Promote students to next grade level
  • Reassign PACEs for new term
  • Rebalance centre assignments
  • Generate term-end reports
  • Archive graduating students

Student Profile Components

Core Information (Required)

Full Name:
  • First name and last name
  • Used in all reports, Goal Check, and communications
  • Format: “First Last” (e.g., “John Smith”)
Date of Birth:
  • Format: MM/DD/YYYY or DD/MM/YYYY (locale-dependent)
  • Used for: Age calculations, grade appropriateness validation
  • Example: 03/15/2013 (currently 11 years old)
Grade Level:
  • Select from dropdown: Grades 1-12
  • Corresponds to ACE PACE levels
  • Used for: Goal Check templates, PACE validation, reporting
  • Example: Grade 5
Learning Centre:
  • Select from active centres in your school
  • Required for Goal Check access (supervisors see students in their centres only)
  • Can be changed if student moves centres
  • Example: “Faith Centre”

Optional Information

Student ID:
  • Your school’s internal ID number
  • Example: “2024-085”, “STU-12345”
  • Useful for: Cross-referencing with other systems, avoiding name confusion
Parent/Guardian Information:
  • Parent names
  • Email addresses (for future parent portal)
  • Phone numbers
  • Emergency contacts
Enrollment Date:
  • When student joined your school
  • Useful for: Historical tracking, tenure calculations
Special Notes:
  • Medical information (allergies, conditions)
  • Learning accommodations
  • Behavioral notes
  • Only visible to administrators and assigned supervisors

Adding Students

Method 1: Individual Entry

When to Use:
  • Adding 1-10 students
  • Mid-year enrollments
  • Quick additions
  • Students with unique circumstances
Process:
1

Navigate to Students

Click “Management” → “Students” in sidebar
2

Click Add Student

Button in top right
3

Fill Required Fields

Name, DOB, grade, learning centre
4

Add Optional Fields

Student ID, parent info, notes (as desired)
5

Save Student

Click “Save” button
6

Assign PACEs

Immediately or later - assign 4-6 PACEs to enable Goal Check
Time Required: 2-3 minutes per student

Method 2: CSV Bulk Import

When to Use:
  • Adding 20+ students at once
  • Start of academic year
  • Transferring from another system
  • Faster and less error-prone for large groups
Process Overview:
1

Download CSV Template

Navigate to Students → Import → Download Template
2

Fill Template in Excel

One row per student with all required columns
3

Upload CSV

Return to Zion, upload filled CSV
4

Validate Data

Zion checks for errors, shows validation results
5

Confirm Import

Review preview, click “Import X Students”
6

Assign PACEs

After import completes, assign PACEs to all students
Time Required: 10-15 minutes for 50 students (not including CSV preparation time) See CSV Bulk Import Guide for detailed instructions.

Learning Centre Assignments

Why Centre Assignments Matter

Centre Assignment Enables:
  • Supervisor Access: Supervisors only see students in their assigned centres
  • Goal Check Workflow: Students appear in correct supervisor’s Goal Check entry
  • Reporting: Centre-level reports show accurate student lists
  • Dashboard Filtering: Real-time dashboards filter by centre
Without Centre Assignment:
  • Student won’t appear in any supervisor’s Goal Check
  • Cannot set goals or mark progress
  • Missing from centre reports

Initial Centre Assignment

Factors to Consider: Grade Level:
  • Group similar grades together (e.g., Grades 1-3 in one centre, 4-6 in another)
  • Enables age-appropriate curriculum and pacing
Centre Capacity:
  • Don’t exceed capacity limits (typically 20-30 students per centre)
  • Balanced class sizes enable better supervision
Supervisor Workload:
  • Balance student count across supervisors
  • Consider supervisor experience and strengths
Student Needs:
  • Place students with special needs with appropriate supervisor
  • Group students with similar ability levels if using ability-based centres
Example Distribution (75-student school):
  • Primary Centre (Grades 1-3): 25 students
  • Elementary Centre (Grades 4-6): 27 students
  • Junior High Centre (Grades 7-9): 23 students

Reassigning Students Between Centres

Common Scenarios:
  • Grade progression (student moves from Primary to Elementary centre)
  • Centre rebalancing (one centre too full, another has space)
  • Student needs change (requires different supervisor approach)
  • Supervisor changes (supervisor leaves, students reassigned)
How to Reassign:
1

Navigate to Student Profile

Find student in Students list, click name
2

Click Edit

Edit button on student profile page
3

Change Learning Centre

Select new centre from dropdown
4

Save

Student immediately moves to new centre
5

Notify Supervisors

Inform both old and new supervisors of change
Effect of Reassignment:
  • Student appears in new centre’s Goal Check immediately
  • Student removed from old centre’s Goal Check
  • Historical data preserved (shows which centre student was in at that time)
Mid-Term Reassignments: Avoid mid-term reassignments unless necessary. Disrupts student routine and supervisor relationships. Best to reassign during term breaks.

PACE Assignments

Why PACE Assignments Matter

PACE Assignments Enable Goal Check:
  • Cannot set daily goals without assigned PACEs
  • Goal entry interface shows assigned PACEs as columns
  • Without PACEs, student effectively cannot use Goal Check
Individualized Learning:
  • Each student has own PACE assignments
  • Different students can work on different PACEs in same subject
  • Enables true individualized pacing (core of ACE methodology)
Progress Tracking:
  • Track which PACEs student has completed
  • See when student started/finished each PACE
  • Historical record of academic progression

Assigning PACEs to Students

Typical PACE Load:
  • Light Load: 3-4 PACEs (primary grades, struggling students)
  • Standard Load: 5-6 PACEs (most students)
  • Heavy Load: 7-8 PACEs (advanced students, high school)
Subject Distribution:
  • Usually 1 PACE per subject concurrently
  • Example: Math 1015 + English 1025 + Science 1035 + Social Studies 1045 + Word Building 1055 = 5 PACEs
Process:
1

Open Student Profile

Click student name from Students list
2

Click Assign PACE

In “Current PACEs” section
3

Search PACE Catalog

Search by number, subject, or grade level
4

Select PACE

Click PACE to assign it
5

Repeat for All Subjects

Typically 4-6 PACEs total
6

Save Assignments

Click “Save” when all PACEs selected
See PACE Assignments Guide for detailed instructions.

PACE Progression

When Student Completes a PACE:
  1. Administrator marks PACE as completed (future feature: auto-complete)
  2. Assign next PACE in sequence (e.g., 1015 → 1016)
  3. Student continues uninterrupted
PACE Numbering:
  • 1001-1012: Grade 1 PACEs across subjects
  • 1013-1024: Grade 2 PACEs
  • 1025-1036: Grade 3 PACEs
  • And so on through Grade 12 (1133-1144)
See PACE Catalog for complete PACE reference.

Student Status Management

Active vs Deactivated

Active Students:
  • Appear in all lists, dashboards, Goal Check
  • Can have goals set and progress marked
  • Counted in reports and metrics
  • This is default status for all students
Deactivated Students:
  • Hidden from active lists (filter required to see)
  • Cannot have new goals set
  • NOT counted in active reports/metrics
  • Historical data preserved (past Goal Check entries remain)
  • Can be reactivated later if needed

When to Deactivate Students

Permanent Departures:
  • Student withdrew from school
  • Student transferred to another school
  • Graduated (optional - some schools keep graduates for historical records)
Temporary Absences (Long-Term):
  • Extended illness (months)
  • Family leave (semester abroad, etc.)
  • Maternity leave (some older students)
Administrative:
  • Duplicate student entries (deactivate duplicate, keep one)
  • Data entry errors (create new correct entry, deactivate incorrect one)
When NOT to Deactivate:
  • Short-term absences (days or weeks) - keep active, just mark 0 pages on absent days
  • Summer break - keep active for continuity into next term
  • Temporary suspensions - keep active

How to Deactivate

1

Navigate to Students List

Management → Students
2

Find Student

Search or scroll to locate student
3

Click Deactivate Button

Button next to student name
4

Confirm Action

Read warning dialog, click “Deactivate”
5

Add Notes

Document why deactivated (date withdrew, reason)
What Happens:
  • Student immediately removed from active lists
  • Supervisors no longer see student in Goal Check
  • Historical Goal Check data remains intact
  • Student profile still accessible with filter

How to Reactivate

1

Navigate to Students List

Management → Students
2

Toggle Show Deactivated

Filter at top of page
3

Find Student

Deactivated students show gray “Inactive” badge
4

Click Reactivate Button

Button next to student name
5

Update Information

Edit student to update grade, centre if needed
6

Verify PACE Assignments

Ensure PACEs still appropriate (may need new assignments)

Student Data Quality

Common Data Issues

Duplicate Students:
  • Same student entered twice (different spellings, typos)
  • Causes: Bulk import errors, multiple administrators adding students
  • Detection: Sort students by name, look for similar names with same DOB
  • Solution: Keep one entry, deactivate duplicate
Missing Information:
  • Students without centre assignments
  • Students without PACE assignments
  • Missing contact information
  • Solution: Regular audits to find and fix
Incorrect Assignments:
  • Student in wrong grade level
  • Student in wrong centre
  • Student with inappropriate PACEs (too easy/hard)
  • Solution: Spot-check randomly, correct as found
Outdated Information:
  • Old contact information
  • Students who withdrew but still active
  • Graduated students still in system
  • Solution: Annual cleanup (end of term)

Monthly Data Audit Checklist

Run These Checks Monthly (15 minutes):
1

Students Without PACEs

Filter students, look for 0 PACE assignments
2

Students Without Centres

Check for unassigned students (shouldn’t exist, but verify)
3

Duplicate Names

Sort by name, look for duplicates
4

Grade Appropriateness

Check for students with ages that don’t match grade level
5

Inactive Status Review

Review deactivated students, confirm still should be deactivated

Best Practices

Initial Setup (Start of Year)

2-3 Weeks Before Term Starts:
  1. Finalize student enrollment list
  2. Create CSV with all student data
  3. Import CSV into Zion
  4. Verify import success (student count matches)
1 Week Before Term:
  1. Assign all students to learning centres
  2. Balance centres by grade/capacity
  3. Notify supervisors of their student lists
First Week of Term:
  1. Assign PACEs to all students
  2. Have supervisors verify their rosters
  3. Correct any errors or missing data
  4. Test Goal Check with few students

Mid-Year Enrollment

New Student Joins:
1

Add Student Immediately

Don’t wait - add on day of enrollment
2

Assign to Centre

Based on grade and capacity
3

Assign PACEs

Based on assessment of student’s level
4

Notify Supervisor

Email or tell supervisor about new student
5

Start Goal Check Next Day

Supervisor sets goals starting next school day

Student Withdrawal

Student Leaves:
1

Generate Final Reports

Create reports showing student’s performance through withdrawal date
2

Deactivate Student

Mark as deactivated with withdrawal date in notes
3

Notify Supervisor

Inform supervisor student no longer in their centre
4

Archive Records

Save final reports and transcript

Annual Cleanup (End of Year)

Last Week of Term:
  1. Generate final reports for all students
  2. Deactivate graduating seniors (optional)
  3. Export student data for archival
  4. Prepare for next year’s grade promotions
Before New Term:
  1. Promote all continuing students to next grade
  2. Rebalance centre assignments (new grade groupings)
  3. Update PACE assignments for new academic year
  4. Reactivate any students returning from leave

Troubleshooting Common Issues

”Student Not Appearing in Goal Check”

Causes:
  1. Student not assigned to learning centre
  2. Student has no PACE assignments
  3. Student is deactivated
  4. Supervisor not assigned to student’s centre
Solutions:
  1. Assign student to a centre
  2. Assign 4-6 PACEs to student
  3. Reactivate student if appropriate
  4. Verify supervisor assigned to correct centre

”Cannot Deactivate Student”

Cause: Student may have active Goal Check entries for today Solution: Wait until next day, or have supervisor remove today’s entries, then deactivate

”Duplicate Student Entries”

Cause: Student added twice (CSV import + manual entry, or two administrators) Solution:
  1. Identify which entry has more/better data
  2. Keep that one as active
  3. Deactivate the duplicate
  4. Note in deactivated entry: “Duplicate of [correct entry ID]"

"Student in Wrong Grade for Age”

Causes:
  1. Data entry error (typo in DOB or grade)
  2. Student legitimately held back or advanced
  3. Student transferred mid-year from different system
Verify: Check enrollment forms for correct DOB and grade, correct as needed